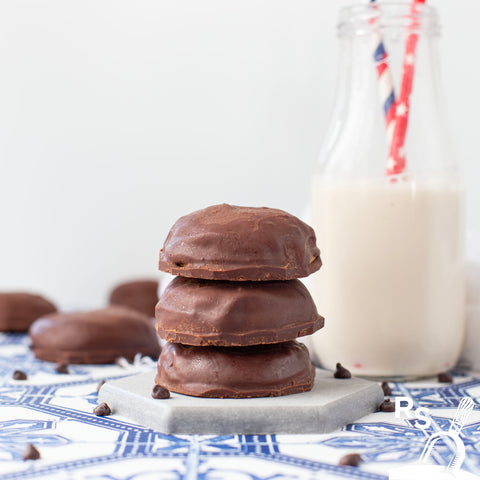
“Peanut Butter” Patties- gluten-free, top 8 allergen free
One of my favorite combinations of flavors growing up was peanut butter and chocolate. We could put these two things together with almost anything and instantly fall in love with it. When Girl Scout Cookie season arrived each winter, you bet we always bought the peanut butter patties. While my mom was anaphylactic to peanuts, she still fed us all peanut butter, bless her heart. She did teach us at a very young age how to minimize cross contact with things she ate or utensils she used. These peanut butter patties were something special, at least to me. The chocolate outside with the soft and creamy peanut butter in the middle on top of a crunchy cookie was what my dessert dreams were made of.
Fast forward to having my own kids with severe life threatening food allergies, one being peanuts. This meant I had to learn to recreate all of our favorite foods from my childhood sans peanuts (among many other foods). Buying Girl Scout Cookies was obviously not an option for us so over time, I made all of the ones we loved. We started by making thin mints as they are pretty simple. I wish I could find the photos of the day we made these for the first time. Our, now middle, was about 14 months old and cute as a button. She had the squishiest cheeks and a sassy little attitude to go along with them. ;) She ate the thin mints and got chocolate all over her face including her hair, they were that good. Ha ha. We can’t seem to find these great photos, sadly.
Down the recipe line came Peanut Butter Patties®, minus the peanut butter of course. So we came up with a Sunbutter recipe because back when our kids couldn’t have any nuts, that was the only peanut butter alternative. Now there are SO many peanut butter alternatives to fit just about anyone's needs. From Watermelon seed butter, WOW Butter (soy based), Almond Butter, to Cashew Butter, etc. When we say we made Peanut Butter Patties, you can make them with any “butter” that works for you! Head on over to grab one of our Rustic Scoop™ Pancake Mixes so you can make these asap! BTW- these are so much better than the ones in a box. ;)
Peanut Butter Patties- gluten-free, top 8 allergen free
Ingredients
1 Rustic Scoop™ Pancake and Waffle Mix
1 Cup Granulated sugar of choice
6 Tablespoons Butter of choice
6 Tablespoons Shortening
¼ Cup Egg whites or powdered egg replacer for 1 egg
1 ½ teaspoons Vanilla
2-3 Tablespoons Milk of choice
Peanut Butter middle
½ Cup Peanut butter or other seed/nut butter that is safe for you
3 Tablespoons Powdered sugar
Dash Milk of choice
dash of vanilla
Chocolate drizzle
1 ½ Cups Chocolate Chips
1 Tablespoon Shortening
Directions
Preheat the oven to 350°F. Prepare 2-3 baking sheets with parchment paper and set aside.
In the bowl of a stand or hand mixer, cream together the butter and shortening. If you don’t want to use shortening (we think it’s best to) you can use all butter. If you use a vegan butter, you’ll need to use less milk as vegan butter has a higher water content than dairy butter. Coconut oil may be a fine substitute for the shortening though we haven’t tried it. It will inevitably make these cookies have a coconut flavor and spread more so keep those in mind. Once the butter and shortening are creamed well together, add the egg white/powdered egg replacer and vanilla. Mix until well combined. Slowly mix in the Rustic Scoop™ Pancake and Waffle Mix, mix on medium speed until combined as much as you can. Slowly start adding milk. Start with 1 Tablespoon then add one more Tablespoon at a time if need be. The final texture of the dough should be a nice pliable dough that isn’t dry and crumbly nor wet and sticky. Keep mixing, it does come together, but sometimes takes a bit.
If you have a silpat mat, place it on your counter. Roll out the cookie dough between two pieces of parchment paper. You should not need non-stick spray or a floured surface. The dough should roll nicely and not stick. Roll the dough out evenly until it is approximately ¼ inch thick. Use a 1 inch circle cookie cutter, cut out the cookies. Gently transfer the cookies to your cookie sheets with parchment paper. If your cookies seem crumbly and don’t roll out of transfer nicely, try adding one Tablespoon milk at a time until the dough isn’t crumbly. Take remaining dough and roll it back out, cut out more cookies. Repeat until all dough is cut out. Leave ½ inch between cookies giving them space to rise.
Bake at 350°F for 10-12 minutes for crisp cookies. They will firm up a bit as they cool. The bake time will vary if you make thicker cookies. Let your cookies cool on the baking sheet for 10 minutes then transfer them to a cooling rack. If you find that the soft cookies are too soft, put them back in the oven for another 2 minutes. Makes approximately 28 cookies depending on the size of the cookies you cut out.
While the cookies are baking, prepare your peanut butter (or any other “butter”). In a medium bowl, add all of the ingredients. Using a hand mixer, beat all of the ingredients together until it is smooth and thick. You can do this with a bowl and spoon, but the mixture is very thick. You need it to be thick so it doesn’t run off your cookie. Once fully mixed, scoop 1 ½ teaspoon balls of the peanut butter mixture. Roll in your hands until it is a bal, then gently press out until almost flat. When your cookies are mostly cool, place the peanut butter round on top of each cookie.
Next, melt the chocolate and shortening in a microwave safe bowl for 1 minute. Stir with a spoon. If you need to microwave for longer, do it in 30 second increments being sure to not burn the chocolate. Using the parchment lined cookie sheets, drizzle a small circle of melted chocolate, then take a cookie and press it onto the chocolate until it barely starts to come out the edges of the cookies. Repeat until all of the cookies are done. Now, go back and cover each cookie with melted chocolate using the back of a spoon to gently push the chocolate over the edges of the cookie to meet the chocolate at the bottom. Repeat until all of the cookies are done. If you’re anxious to eat these like we are, you can freeze them on the cookie sheets for 10 minutes or until the chocolate is hard. Otherwise, just let them sit on the counter until the chocolate hardens. If you’re a perfectionist, you can use a simple butter or paring knife to cut the extra chocolate around the bottom of your cookies so they look like domes instead of flying saucers. Whatever you choose, enjoy!
We would love to hear if you make these and know what you think!